Below is a blank chord diagram. Think of it as a
picture of your guitar sitting in front of you.
The 6 vertical lines represent the 6 strings on a guitar
(low E on left side, high E on right). The horizontal
lines represent frets except for the top line which is
the nut of the guitar.
Black
dots on the diagram tell you what fret and string to
place your fingers. Numbers inside the dots tell you
which finger to use.
White
dots mean to play the string open.
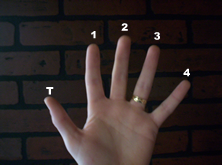
Here's how the fingerings are mapped out on your hand:
=second
finger
Try it!
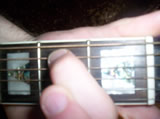
To play the chord on this chart, place your 2nd finger
on the 2nd fret of the 5th string and strum all six
strings.
You just played an E minor 7th chord!
Important:
If you see an "X" on a chord chart that simply
means that you do not strum that string, otherwise all
strings are played. In the example A chord below you'll
see an "X" over the 6th string. This means
that the string is not used in the chord, so you
will not strum it when playing the chord.
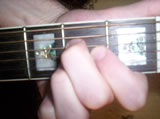
To play this chord, you place your 2nd finger on the
D string (4th) at the second fret, your 3rd finger
on the B string (2nd string) at the second fret, and
your
1st finger on the G (3rd) string second fret. The
A string (5th) and High E string (1st) will be played
open ("open" means
that the string is not fretted, but strummed in the
chord pattern).
Playing Chords
When you're first learning to play chords, it can be very difficult
to get your fingers to cooperate. After a few days of
practice your fingers will start remembering where to
go. It's important to spend a little time everyday with
problem chords until you are comfortable with playing
them.
Your fingertips on your fret hand will become sore and
tender to the touch. If it becomes too painful, by all
means stop practicing for the day and try again the next
day. With steady practice you will develop callouses
on your fingertips and this won't be any more problem.
If you're hearing a buzzing sound or the sound of the
notes being played sound dull, then your not pressing
hard enough on the strings, or one or more of your fingers
is catching a nearby string. When you strum the chord
each not should ring out clearly. You may find it hard
at first to press all of the strings down firmly against
the frets. Don't worry, your hands will build up the
strength in no time with practice.
Some Random Tips:
Don't let your fingernails get too long! They
will prevent you from fingering the fretboard correctly.
Make sure your fingers are standing straight up
and down. Otherwise they may mute other strings.
When playing chords your fingers should be arched
at the joints so that your fingertips come in
contact with the strings and not the flat fingerprint
part
of your finger.
Your fingers should make contact with the strings
slightly behind the frets if at all possible. The
further your finger is from the fret the harder it
is to apply
the proper amount of pressure, hence the more likelihood
that you'll get a "buzzing" sound.
The size of your hand and the width of your instrument's
neck can significantly affect which fingers you
use to play the chords. All of the chord charts on
this
site use the most commonly used chord fingerings.
These fingerings will work for 95% of all guitarists.
You may come across a suggested chord fingering
that you simply cannot contort your fingers to play.
In
this case try experimenting with alternate fingerings.