Sliding is an effective technique for creating a very
vocal, wailing sound on your guitar. It is popular with
many lead guitarists, especially in blues.
I'll give you a brief overview in playing slide guitar,
and then we'll use what we have learned in a simple song.
The very first thing that you should know is that in
this lesson case the guitar is tuned to open G. That
means that you'll hear a G chord when all six open strings
are strummed.
Here's how you'll want to tune your guitar: D, G, D,
G, B, D (instead of E, A, D, G, B, E). All you have to
do is tune the low E, A, and high E strings down one
step. I highly suggest that this is done with a chromatic
tuner!
You can use the audio below to help you get in tune
if you don't have a tuner handy. I play each note 3 times
starting with the low D string (or the low E in standard
tuning) then you'll hear all six strings strummed together:
1.) Tune to Open G Tuning - D, G, D, G, B, D
2.) Grab a slide and place it on your pinky finger (4th
finger).
There are many different types of slides you can buy,
and they aren't too expensive.
Some claim that you can use the bottleneck of a bottle,
but really that is a little
dangerous unless you're a handy man and can sand down
glass.
I would just recommend going to your local music shop
and purchasing one.
Lately I've even seen slides at Wal-Mart. Doesn't EVERYONE
have a Wal-Mart?
3.) View this picture and make sure you have your fingers
in the same position.
Some people prefer the slide on the 3rd finger, but
I have found it works best on the fourth.
Note: It's always a good idea to view the tablature
that you are playing BEFORE starting to actually play
the slide part. If there comes a time where ONLY slides
are being played, or in other words - no actual 'fretting'
on any finger, you may be able to use your 1st finger.
I do that quite frequently, but do this ONLY after
you have investigated the tablature and made sure that
you don't
need to use any other fretted fingers in the given
song.
To prevent unmusical noise, you should wear the slide
on your pinky and lightly rest your other fingers below
the slide (i.e., between the slide and the headstock).
This also keeps your first three fingers free to make
chords and play single string non-slide licks.
If you are going to be fretting the notes without
a slide at the same time, you will need to use the
slide on either your 3rd or 4th finger.
4.) Make sure that your slide is ALWAYS perpendicular
to the strings being played.
5.) Now, cover ONLY the string(s) that will be affected
with the slide. That will keep you from having to dampen
unwanted noise on non-played strings during the slide.
6.) Try your absolute best to place the slide almost
right on the metal fret spacer in between the notes you
are to play.
For example: Let's say you are trying to play a slide
on the 4th fret of the "G" string to the 6th fret of
the "G" string. You will want your slide to ALMOST
come in contact between the 4th and 5th metal fret
spacer, but not ON the 5th fret spacer.
Here's an example of where the slide should rest in
relation to the fret. It should be right up against
the fret spacer, still on the same string that you
want to slide on, but NOT in the middle of the fret.
Remember, if this was the fourth fret that the red
line rests on, you are actually closer to the 5th fret
than the 3rd fret, as shown below.
7.) Simply move your slide back and forth on one string
to hear what it should sound like.
When playing slide guitar, it is ideal that you have
a very high-action guitar neck. Strings that sit real
close on the fretboard will be harder to play than
a raised-action guitar. An acoustic guitar that offers
a nice slide is the Ovation Celebrity, which has real
high-action. It's much harder to play barre chords
on it, but it's easier sliding.
8.) Practice moving around the fretboard, one note at
a time, until you hear what a desired slide should sound
like.
It's hard to explain what a slide should sound
like, but once you hear it - you'll just know you
have it down. We'll get into that further down.
9.) Try different tunings. Remember - any open tuning
works easiest.
If you play in regular tuning, you will have
to dampen the strings that you are not touching because
they will sound wrong.
10.) Try This Example in standard tuning:
Ok. So I just told you to tune to Open G, so you have
a choice.
If you would like to practice slide with Open G tuning
(if you have tuned to it), click
here.
If you would like to practice slide with standard tuning,
read below:
"Big Empty" by Stone Temple Pilots UNPLUGGED
Riff Rundown
Difficulty: Intermediate
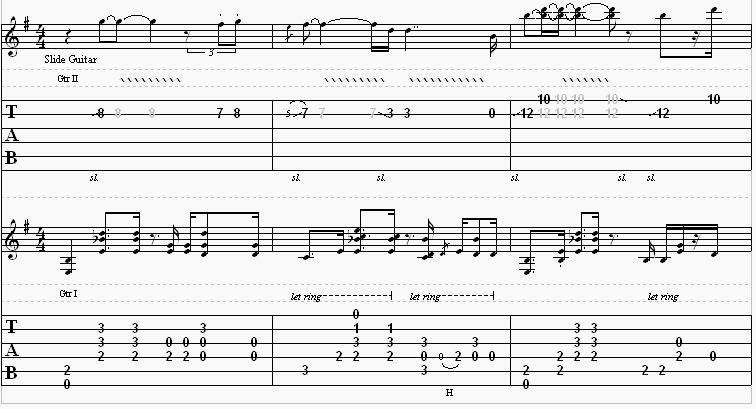
Intro
A good rule of thumb in this intro is that for every
time you see a "sl." it will mean to slide with the actual
slide on your finger, and not just a basic slide without
the slide on your finger. Notice in the very first measure
you open with a slide, but then fret two notes, which
are the 7 and 8 on the B string. You don't slide with
those. You fret them. However, if you are still learning
slide in the most basic of fashions, you can still slide
those notes for practice - OR - if you prefer to slide
those notes. Remember, it's all about the feeling.
One thing that should be noted is what is found at the
third measure below. You'll see a slide to the 12th fret,
but then right after that, a vibrato on the tenth fret
on the High E string. Both of these notes should be played
with a slide, as well as any other time you see a vibrato,
which is a ribbon-like strand that appears from left
to right.
Here is the full intro :
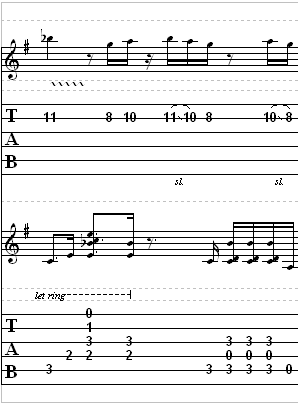
Here are just the chords so you can practice your slide
:
I hope this mini-lesson has opened a few more doors
for you in the world of slide guitar.
I plan on adding more to this soon, but for now this
should get you started.