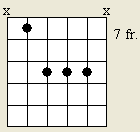
B
D
E


Difficulty: Intermediate
B |
D |
E |
|
|
|
The Intro and Verse 1 are completely identical, HOWEVER I want you to hear something very important.
As you'll see, the chords are standard B's, D's, and
E's the ENTIRE time, but they are not played using
open chords. These are played with power chords. In the intro, I played the
chords using open format, and then
for the verse I played them using power chords. I want you to see what a difference
the two can make.
Though it might not be too noticeable, it is most definitely different. If
you still have trouble playing power chords
you may use the chords in their open position, but I don't think you will be
able to play it up to speed. The power
chords allow you to brisk right through the rhythm, whereas the open chords
may be too hard to switch to at the
bpm you will hear this song.
Here is the complete intro with open chords being used.

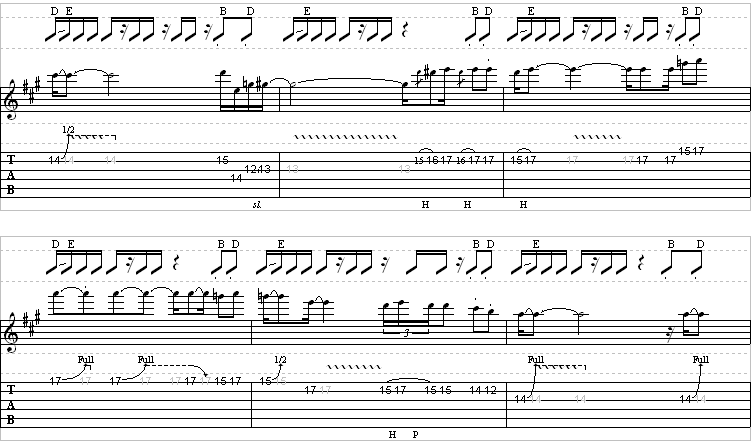
The rhythm theme repeats itself throughout the intro with the lead playing the main theme over the rhythm.
The rhythm guitar part is guitar 1, and the lead is guitar 2.
Here's the full intro:
Here's the rhythm part:
Here's the lead part:
*Note - When listening
to the intro you'll hear that there is NO SLIDE from D to E like there
is in the verse
below.
This is because you can't slide open chords in the same way as you can with power chords.
As said above, the song is ACTUALLY supposed to be played with power chords. In the verse, I do just that.
Listen closely to the difference between the two and I think you'll see what
I mean.
Again, once you learn the intro, the first verse is literally the same, as
well as the guitar break that you'll find on the
PTB/PDF score.


Here's the full verse:
Here's the rhythm for the verse to practice over:
In the second verse you are playing the same thing. However, you'll notice at the end that you will transition into a guitar solo. What we are going to do is skip this part completely and head straight for the solo.
You shouldn't have much trouble with the part that leads into this solo because if you can play the solo, that little piece is nothing.
Again, the rhythm theme stays the same throughout. Just focus on the lead part here.
Here's the full lead:
Here's the rhythm again:
Below are some notes I have placed on each part of the solo.

Notes: In this part, you'll see that there are only a few full bends and a triplet. Try your best to let the notes ring and give some major vibrato to enhance the way this song sounds. The 'trippier' the better.

Notes: A nice collection of bends, pulls, and slides, these three measures hint back at the main theme. A good rule of thumb for not only this part but all other solo parts is that you'll see a recurring guitar theme ALWAYS comes right on the B and D power chords that are dotted in the measures at the top of the tablature staff. This is a great 'pick-up' place for lead work.
Notes: This time we have two bars at a time, though they are all around the same area of the lead guitar work. Again, pay close attention to your 'pick-up' chords B and D.


Notes: This is another repeating pattern, with the 'pick-up' notes on the B and D again. That's why this lesson is so easy to work with, because the structure is really logical and not too hard to play!
Though this SHOULD be easy compared to the actual guitar solo, the outro also has some nice lead work and must be shown.
The rhythm stays the same, and a great deal of the outro is a recap of what you have already learned.


